Text size:
How to tame the "Swiss army knife" of audio and video manipulation…
Foreword© Copyright 2006-2026 Howard Pritchett.
Permission is granted to copy, distribute and/or modify this document
under the terms of the GNU Free Documentation License, Version 1.2
or any later version published by the Free Software Foundation;
with no Invariant Sections, no Front-Cover Texts, and no Back-Cover
Texts. A
copy of the license
is available from the Free Software Foundation.
FOREWORD
Since I put up this page I've had loads of e-mails asking how to do this, that and the other with ffmpeg. As is mentioned later on this page, I'm no ffmpeg expert so I'm not really the person to ask and such questions will be ignored. Please visit this page.
INTRODUCTION
I recently became curious about converting between video formats, wondering if there was anything I could do to reduce the size of the various .mpg, .flv, .avi and .mov files that I have lying around. I also wondered if it would be possible to convert some of these files to the .3gp format used by 3G cellphones, and if it would be possible to rip a DVD-Video to DivX. Finally, I wanted to know if I could rip DVDs of concerts and operas that I have and listen to them on my MP3 player. Best of all would be the ability to do all of this with a single tool.
Well, it is possible, and that single tool is ffmpeg.
This tutorial should enable you to install ffmpeg and the auxiliary libraries that will give ffmpeg support for various codecs. It'll then go on to explain the basics of what a video file is, how it's created by ffmpeg and how a media player takes it apart again to display the picture and give you the sound. Next, you'll find out how to influence the way the data is produced. Finally, I'll deal with more advanced topics such as merging several sources and introducing time differentials.
What you will not find out in this tutorial is the usage of absolutely every option available to ffmpeg, nor will you find out details of any particular codecs or container formats. Complete mastery of the subject is beyond the scope of this howto and certainly well beyond my own knowledge. If you want to learn more then I'm sure there's plenty of reading available on the 'Net − not to mention ffmpeg's source code itself.
DEPENDENCIES
Support for many codecs and file formats is already provided by libavformat and libavcodec, two libraries that are supplied in ffmpeg's source. However, if you want support for a few more common (and not so common) codecs and formats then you'll need to install a few external libraries and get ffmpeg to use them. Refer to the sites linked to here and/or to instructions contained in the source tarballs for details on how to install the following pieces of software:
- MP3
Support for MP3 audio is provided by the LAME MPEG Audio Layer-III encoder library, which is available here: http://lame.sourceforge.net.- GSM
If, like me, you use a system that e-mails you GSM audio attachments of messages left in your voicemail then you'll need libgsm to convert them and play them back. libgsm is in fact a bit of a pig to track down so I'm providing it here:
libgsm-1.0.13.tar.bz2
libgsm-1.0.13.tar.bz2.md5- DivX
DivX is a variant of MPEG4. While ffmpeg can produce MPEG4 on its own, it requires an external library to produce something to the specifications of DivX, and it's the XviD library that takes care of this. XviD is available from xvid.org.- AMR
3G cellphones use the AMR wideband and narrowband codecs for audio streams in .3gp video files. These codecs are available from the 3gpp.org website (if you have the patience to find them) but their installation is not straightforward. A kind soul in the Czech Republic, Stanislav Brabec, has bundled the codecs into Linux-friendly libraries that are used by ffmpeg. See here.- OGG/Vorbis
Vorbis is a recently-developed audio codec similar to MP3 in its working but totally free, unlike MP3. There are licensing issues around MP3 which mean that the owner of the technology, the Fraunhofer Institute, began imposing a fee of $15,000.00 plus $5.00 per encoder and 50 cents per player sold or distributed. [Ref. Wired magazine Sept. 2001, pg 74 article by Pete Rojas]. The Vorbis audio codec is managed by the libvorbis library available from xiph.org. The encoded data is packaged into .ogg files by libogg, also available from the same page.- AAC − Advanced Audio Coding
Also known as MPEG-4 audio, AAC is used by many mainstream media devices such as the iPod and most 3G cellphones. In order to convert to/from formats using AAC, you'll need two libraries. libfaad takes care of decoding AAC while libfaac takes care of encoding it. These libraries are available from sourceforge.net.- Subversion
ffmpeg's source code is distributed from a Subversion repository. You'll need the Subversion client (svn) to grab it. See subversion.tigris.org.THE BASICS OF AUDIO/VIDEO
In reality, the subject is far more complex than I'm about to describe here. This said, you won't really need to know more than these basics for everyday use of ffmpeg.
The first hurdle you need to get over is the fact that the type of file you're dealing with (.avi, .mpg, .mov etc.) isn't the only factor to take into account. I wouldn't need to work now if I was given a penny each time someone said to me something like "I have two AVI files. One plays back and the other doesn't, and this stupid machine complains about missing code-c's or something like that. What do I do?"
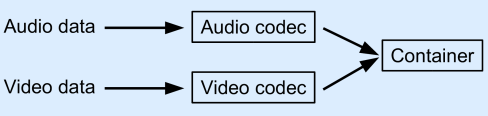
This diagram should help explain what's going on:
Audio and video would use up huge amounts of storage space if they were stored raw. Assuming an NTSC standard video at 720x480 pixels, 30 frames per second and 24-bit RGB color, we're talking about 1,036,800 bytes per frame. That's nearly 30MB per second, or over 200GB for a 2-hour movie. And that's just the video… Something needs to be done so that the movie can be stored on a consumer-grade medium such as a Digital Versatile Disc (DVD). The data needs to be compressed.
Traditional, lossless compression algorithms such as ZIP, gz and bzip2 don't get anywhere near reducing the size of the data enough, so we need to look into lossy compression, ie: compression that is far more efficient but with a trade-off in that the picture quality suffers. The same applies to audio with a degradation of the sound quality. The object of much research over the past few decades has been the elaboration of new algorithms that manage to reduce the quantity of data needed for the audio and video while also reducing the damage done to the picture and sound as a result of the compression. These algorithms that allow us to encode the data in order to transport it, and to decode the data the other end, are called codecs. Several codecs are contained in the libavcodec library supplied with ffmpeg − others are provided by LAME, libgsm, XviD, AMR and libvorbis.
Once the audio and video streams have been encoded by their respective codecs, this encoded data needs to be encapsulated into a single file. This file is called the container. One particular type of container is AVI (Audio-Video Interleaved). AVI is only a method of mixing the encoded audio and video together in a single file. It contains data informing the media player trying to play the file back what audio and video codecs were used, and there are many different possible combinations of codecs that can be used within each type of container, which explains why a system may play back some AVI files and not others. The system can extract the encoded audio and video data from the AVI file no problem, but can it decode that encoded data once it has done so? Only if the required codecs are present.
The algorithms used to pack the encoded audio and video data into various types of containers are mostly contained in the libavformat library supplied with ffmpeg. Support for OGG files containing Vorbis-encoded audio data is supplied by libogg.
Playback of a multimedia file operates in the exact opposite direction. All you have to do is refer to the diagram above having reversed the direction of all the arrows. Once the container used is identified, it tells us which codecs are needed to decode the data. The audio and video streams are then extracted from the container and fed through the appropriate codecs, and out the other end we get raw audio and video data that can be fed to the audio and display subsystems of the computer.
WHAT IS FFMPEG, THEN?
ffmpeg is a tool that, in its simplest form, implements a decoder and then an encoder, thus enabling the user to convert files from one container/codec combo to another, for example a VOB file from a DVD containing MPEG2 video and AC3 audio to an AVI file containing MPEG4 video and MP3 audio, or a QuickTime file containing SVQ3 video and MP3 audio to a 3GP file containing H263 video and AMR wideband audio. The original container is examined and the encoded data extracted and fed through the codecs. The newly-decoded data is then fed through the "target" codecs into the new container.
ffmpeg can also do a few basic manipulations on the audio and video data just before it is re-encoded by the target codecs. These manipulations include changing the sample rate of the audio and advancing or delaying it with respect to the video. They also include changing the frame rate of the resulting video, cropping it, resizing it, placing bars left and right and/or top and bottom in order to pad it when necessary, or changing the aspect ratio of the picture (if the container supports anamorphic display − not all do). Furthermore, ffmpeg allows importing audio and video from different sources, thus allowing dubbing for example.
Another piece of software similar to ffmpeg is transcode, but it seems far less flexible to me than ffmpeg when it comes to manipulating audio and video streams. Parts of transcode, though, are invaluable for grabbing data off DVD-Videos, in particular tcprobe (used for getting information about titles on the DVD), tccat (for descrambling − if libdvdcss is installed − and extracting the VOB files from the DVD, you'll also need libdvdread) and sometimes tcextract for extracting the various audio, video and subtitle streams from the VOB files. This said, mplayer (built on ffmpeg) is perfectly capable of extracting titles from a DVD-Video and ffmpeg can extract the individual channels from the resulting .vob file.
BUILDING FFMPEG
First of all you need to grab the source code. Go to http://ffmpeg.mplayerhq.hu/download.html and follow the instructions for getting the latest SVN release.
Once that's done we need to configure the build process using an autoconf-like (but not actually based on autoconf in the case of ffmpeg) script. Don't forget to add a --prefix option if you're planning on installing ffmpeg in an area other than /usr/local, and --extra-cflags and --extra-libs options if you've installed any of the dependencies in areas other than /usr and /usr/local.
cd into the ffmpeg directory and run the following:
$ ./configure --enable-gpl --enable-liba52 --enable-libgsm --enable-libxvid \
--enable-libamr_nb --enable-libamr_wb --enable-libmp3lame --enable-libogg \
--enable-libvorbis --enable-libfaac --enable-libfaad --enable-shared
Explanations:
- --enable-gpl
ffmpeg is usually released under the GNU Lesser General Public Licence (LGPL). However, some modules that can be included in it, such as liba52 for example, are released under the GNU General Public Licence (GPL). If these optional modules are included then the GPL must apply to the whole of ffmpeg and the libavcodec and libavformat libraries. This option enables the building of a GPL'ed version of ffmpeg et al.- --enable-liba52
This (optional because it modifies the licence of ffmpeg) library, liba52, which is part of libavcodec, contains the codec used to decode and encode AC3 audio commonly used on DVD-Videos.- --enable-libgsm --enable-libxvid
Tells ffmpeg to use these two dependencies installed earlier.- --enable-libamr_nb --enable-libamr_wb
Tells ffmpeg to include support for AMR narrowband and wideband.- --enable-libmp3lame --enable-libogg --enable-libvorbis --enable-libfaac --enable-libfaad
Tells ffmpeg to use these dependencies installed earlier.- --enable-shared
This tells the compiler to build libavformat, libavcodec and libavutils as shared libraries. If you're planning on simply using ffmpeg in order to transcode audio and video files then it doesn't really matter whether you build ffmpeg this way or not. On the other hand, if you're planning on writing your own multimedia software that incorporates these libraries then you'll be making things easier for yourself in the long run by building them shared and linking them dynamically into your executable.You should end up with output similar to this:
install prefix            /usr/local
source path               /home/howard/src/ffmpeg
C compiler                gcc
make                      make
.align is power-of-two    no
ARCH                      x86_32 (generic)
big-endian                no
MMX enabled               yes
CMOV enabled              no
CMOV is fast              no
gprof enabled             no
debug symbols             yes
strip symbols             yes
optimize                  yes
static                    yes
shared                    no
postprocessing support    no
software scaler enabled   no
video hooking             yes
Imlib2 support            no
FreeType support          yes
network support           yes
IPv6 support              yes
threading support         no
SDL support               yes
Sun medialib support      no
AVISynth enabled          no
liba52 support            yes
liba52 dlopened           no
libamr-nb support         yes
libamr-wb support         yes
libfaac enabled           yes
libfaad enabled           yes
libfaad dlopened          no
libgsm enabled            yes
libmp3lame enabled        yes
libnut enabled            no
libogg enabled            yes
libtheora enabled         no
libvorbis enabled         yes
x264 enabled              no
XviD enabled              yes
zlib enabled              yes
License: GPL
Creating config.mak and config.h...
This recaps the options with which ffmpeg will be built. We're now ready to build ffmpeg:
$ makeDepending on the speed of your machine it can take a while for ffmpeg to build. On mine (Celeron 2.93GHz with 1GB RAM) it takes about 5 minutes. Once it's finished building and if there are no errors, we can install it. If there are errors you'll need to ensure that the various libraries that you asked ffmpeg to use are available in standard directories (/usr and /usr/local). If they're elsewhere you'll have to go back to the ./configure command and add the appropriate --extra-cflags (to add the correct include path) and --extra-libs (to tell the linker where to look for the libraries) options. If that still doesn't work you can always join the ffmpeg users' mailing list and ask for help.
Next you want to remove any traces of previous versions of the shared libraries built just now:
$ su -c "rm -f /usr/local/lib/libav{format,codec,util}.*"
Password: (enter your root password here)
  ... or for some distros:
$ sudo rm -f /usr/local/lib/libav{format,codec,util}.*
If you selected an installation directory that doesn't require extra privileges for you to write in it:
$ make installIf you need root access to write to the installation path:
$ su -c "make install"
Password: (enter your root password here)
  ... or for some distros:
$ sudo make install
ffmpeg is now installed and you can start using it.
BASIC AUDIO TRANSCODING
Start by ripping an audio track from a music CD and calling the resulting file audio.wav. There are plenty of documents on the 'Net explaining how to do this if you don't yet know how to.
Next, get ffmpeg to identify the file. The easiest way is to tell ffmpeg to use it for its input and not tell it to do anything with it. The duration you'll see in the output below will obviously be different from my example unless by some fluke you're using exactly the same track of the same CD (track 15, The Forgotten pt. II, of Joe Satriani's "Flying In A Blue Dream" for those who are curious).
$ ffmpeg -i audio.wav
FFmpeg version SVN-r9607, Copyright (c) 2000-2007 Fabrice Bellard, et al.
  configuration:  {snipped for brevity}
  libavutil version: 49.4.1
  libavcodec version: 51.40.4
  libavformat version: 51.12.1
  built on Jul 12 2007 20:22:46, gcc: 3.4.6
Input #0, wav, from 'audio.wav':
  Duration: 00:05:08.1, start: 0.000000, bitrate: 1411 kb/s
  Stream #0.0: Audio: pcm_s16le, 44100 Hz, stereo, 1411 kb/s
Must supply at least one output file
Okay then. the track is 5 mins 8.1 seconds long, the "codec" used (in quotes because the sound isn't compressed at all in the case of audio files ripped from a CDDA) is PCM (Pulse Code Modulated) with signed, 16-bit, little-endian samples. The sample rate is 44100Hz, there are two audio channels (stereo) and the resulting bitrate is 1411kbit/s.
Fair enough. Let's convert this to an MP3 file:
$ ffmpeg -i audio.wav -acodec mp3 -ab 192k audio.mp3
FFmpeg version SVN-r9607, Copyright (c) 2000-2007 Fabrice Bellard, et al.
  configuration:  {snipped for brevity}
  libavutil version: 49.4.1
  libavcodec version: 51.40.4
  libavformat version: 51.12.1
  built on Jul 12 2007 20:22:46, gcc: 3.4.6
Input #0, wav, from 'audio.wav':
  Duration: 00:05:08.1, start: 0.000000, bitrate: 1411 kb/s
  Stream #0.0: Audio: pcm_s16le, 44100 Hz, stereo, 1411 kb/s
Output #0, mp3, to 'audio.mp3':
  Stream #0.0: Audio: mp3, 44100 Hz, stereo, 192 kb/s
Stream mapping:
  Stream #0.0 -> #0.0
Press [q] to stop encoding
[mp3 @ 0x852f018]lame: output buffer too small (buffer index: 592, free bytes: 1712)
size=    7221kB time=308.1 bitrate= 192.0kbits/s
video:0kB audio:7221kB global headers:0kB muxing overhead 0.000000%
The error message about the output buffer being too small is nothing important. It's merely a result of the way data is passed between ffmpeg and the external codec, LAME. This is what you should have right now:
$ ls -ls
total 60384
 7236 -rw-r--r--  1 howard users  7394742 2006-10-10 23:36 audio.mp3
53148 -rw-r--r--  1 howard users 54363436 2006-10-10 23:20 audio.wav
See how small the MP3 file is compared to the original, uncompressed WAV file.
Explanations:
- -i audio.wav
This tells ffmpeg that we want it to take audio.wav and process it.- -acodec mp3
This tells ffmpeg to use the "mp3" audio codec to create the target file.- -ab 192k
This tells ffmpeg to use an audio bitrate of 192 kbit/s. The higher this value, the better the audio quality, but the larger the resulting file. 192 kbit/s is pretty good quality audio.- audio.mp3
Dump the encoded audio data into a file called audio.mp3.Personally I prefer to compress audio to OGG/Vorbis rather than MP3. For one thing the codec is totally unencumbered with legal crap, and for another it gives far better results than MP3 at equal bitrates. This is how I'd convert audio.wav to OGG/Vorbis using ffmpeg:
$ ffmpeg -i audio.wav -acodec vorbis -aq 60 audio.oggExplanations:
- Vorbis is a variable bit rate (VBR) codec, which means that you tell it to create audio of a given quality and it uses however many bytes of data it takes to achieve that goal. The (undocumented in the man page!) "-aq" option of ffmpeg is how you tell it what audio quality to ask of a VBR codec, and the numerical value you give is interpreted differently by different codecs. In the case of the Vorbis codec, "0" is the poorest quality available, getting better with larger values. The value of "60" used here results in audio at roughly 160 kbit/s, which is very good.
So far so good. Now let's resample the audio at 22050 Hz instead of 44100 Hz, convert it to mono, use a much lower bitrate and generate an MP2 file instead of MP3:
$ ffmpeg -i audio.wav -acodec mp2 -ac 1 -ar 22050 -ab 64k audio.mp2
FFmpeg version SVN-r9607, Copyright (c) 2000-2007 Fabrice Bellard, et al.
  configuration:  {snipped for brevity}
  libavutil version: 49.4.1
  libavcodec version: 51.40.4
  libavformat version: 51.12.1
  built on Jul 12 2007 20:22:46, gcc: 3.4.6
Input #0, wav, from 'audio.wav':
  Duration: 00:05:08.1, start: 0.000000, bitrate: 1411 kb/s
  Stream #0.0: Audio: pcm_s16le, 44100 Hz, stereo, 1411 kb/s
Output #0, mp2, to 'audio.mp2':
  Stream #0.0: Audio: mp2, 22050 Hz, mono, 64 kb/s
Stream mapping:
  Stream #0.0 -> #0.0
Press [q] to stop encoding
size=    2407kB time=308.1 bitrate=  64.0kbits/s
video:0kB audio:2407kB global headers:0kB muxing overhead 0.000000%
Notice how much smaller audio.mp2 is than audio.mp3.
Explanations:
- -ac 1
Tells ffmpeg to downmix the audio input to 1 audio channel (mono) instead of leaving it as the input (stereo, 2 channels).- -ar 22050
Tells ffmpeg to resample the audio at 22050 Hz instead of leaving it at 44100 Hz.Now let's convert this MP2 file back to WAV PCM but with unsigned 8-bit samples instead of 16-bit. Reminder, WAV PCM is uncompressed so we don't need to specify a bit rate:
$ ffmpeg -i audio.mp2 -acodec pcm_u8 audio.8bit.wav
FFmpeg version SVN-r9607, Copyright (c) 2000-2007 Fabrice Bellard, et al.
  configuration:  {snipped for brevity}
  libavutil version: 49.4.1
  libavcodec version: 51.40.4
  libavformat version: 51.12.1
  built on Jul 12 2007 20:22:46, gcc: 3.4.6
Input #0, mp3, from 'audio.mp2':
  Duration: 00:05:08.1, start: 0.000000, bitrate: 63 kb/s
  Stream #0.0: Audio: mp2, 22050 Hz, mono, 64 kb/s
Output #0, wav, to 'audio.8bit.wav':
  Stream #0.0: Audio: pcm_u8, 22050 Hz, mono, 176 kb/s
Stream mapping:
  Stream #0.0 -> #0.0
Press [q] to stop encoding
size=    6635kB time=308.1 bitrate= 176.4kbits/s
video:0kB audio:6635kB global headers:0kB muxing overhead 0.000648%
Note that running the following command will give you a list of the codecs and formats that ffmpeg can work with:
$ ffmpeg -formatsWhat this section should have taught you:
- The "-i" option tells ffmpeg what file to use for input. This is the file that you want to convert into something else.
- You can tell ffmpeg which audio codec to use in the target file with the "-acodec" option. The special case "-acodec copy" tells ffmpeg to use the same codec to encode as was used to decode. In other words, no transcoding of the audio occurs.
- It is possible to resample the audio on the fly using the "-ar" option, to set the bit rate and thus the quality of the resulting file with the "-ab" option, and to downmix stereo to mono (or even Dolby 5:1 to stereo or mono) with the "-ac" option.
BASIC VIDEO TRANSCODING
Let's start by grabbing a Flash Video .flv file from YouTube. This can't be done directly so we need to enlist the help of a third party site to do this. Go to http://javimoya.com/blog/youtube_en.php and enter this URL into the input zone at the top of the page:
http://www.youtube.com/watch?v=orLpZxEd24YYour browser will then download a file that you should rename to kitty.flv since this is a video showing the musical purrrrrrowess of a young, furry, feline composer.
Let's see what ffmpeg can tell us about this video:
$ ffmpeg -i kitty.flv
{output snipped}
Seems that stream 1 comes from film source: 1000.00 (1000/1) -> 25.00 (25/1)
Input #0, flv, from 'kitty.flv':
  Duration: 00:01:43.4, start: 0.000000, bitrate: N/A
  Stream #0.0: Audio: mp3, 22050 Hz, mono
  Stream #0.1: Video: flv, yuv420p, 320x240, 25.00 fps(r)
This shows that the audio stream is a mono track sampled at 22050 Hz and MP3-encoded. The video stream was encoded using the "flv" (Flash Video) codec, "yuv420p" is how the color is encoded, the picture resolution is 320x240 pixels and the frame rate is 25 frames per second. Kitty is about to make his TV début so we need to have a copy of this file in a form that can be used for broadcast. An NTSC MPEG file that would otherwise end up on a DVD will do fine:
$ ffmpeg -i kitty.flv -target ntsc-dvd -aspect 4:3 kitty.mpg
{snipped}
Seems that stream 1 comes from film source: 1000.00 (1000/1) -> 25.00 (25/1)
Input #0, flv, from 'kitty.flv':
  Duration: 00:01:43.4, start: 0.000000, bitrate: N/A
  Stream #0.0: Audio: mp3, 22050 Hz, mono
  Stream #0.1: Video: flv, yuv420p, 320x240, 25.00 fps(r)
Output #0, dvd, to 'kitty.mpg':
  Stream #0.0: Video: mpeg2video, yuv420p, 720x480, q=2-31, 6000 kb/s, 29.97 fps(c)
  Stream #0.1: Audio: ac3, 48000 Hz, mono, 448 kb/s
Stream mapping:
  Stream #0.1 -> #0.0
  Stream #0.0 -> #0.1
Press [q] to stop encoding
frame= 3095 q=2.0 Lsize=   45130kB time=103.2 bitrate=3581.1kbits/s
video:31666kB audio:5660kB global headers:0kB muxing overhead 20.909333%
Explanations:
- -target ntsc-dvd
"-target" is one of the most useful options of ffmpeg. It instructs ffmpeg to just "do what it takes" for the target file to be usable on an NTSC DVD-Video in this case (there are other pre-defined targets). This includes selecting the correct audio and video codecs, appropriate bit rates, image size, frame rate and other parameters. Indeed, if we look at the lines in the "Output #0" section of the output above, we see that the video is set to MPEG2 video, yuv420p color encoding, 720x480 pixel image size, 6 mbit/s bit rate, 29.97 frames per second (the q=2-31 part is the admissible quality levels, 2, the best, to 31). The audio stream is ac3-encoded with a sampling rate of 48 KHz, mono at 448 kbit/s. These are standard parameters for a DVD-Video with a mono soundtrack and can be overridden.- -aspect 4:3
MPEG2 video allows for anamorphic display. This means that the aspect ratio (width divided by the height) of the physical picture displayed on-screen can be different from the ratio obtained by dividing the pixel-width of the image by its pixel-height. This has to be built in to the video specification used with DVDs because, regardless of whether we're viewing a movie in old 4:3 aspect ratio or a movie in 16:9 widescreen format, the pixel size of the digital image is still 720x480 for an NTSC DVD (720x576 for PAL). The image is in fact stretched such that its aspect ratio is as specified by the "-aspect" option. This usually involves stretching it only along its width or along its height, hence the name "anamorphic".Given that the original was a movie at a resolution of 320x240, we really don't need the full 6 mbit/s bit rate, especially as the codec wasn't even able to use the full bandwidth and ended up limiting itself to about 3.5 mbit/s. We can try and create a smaller file by getting the codec to try and keep to 2 mbit/s. The DVD standard also allows for MP2-encoded audio, so let's override both the video bitrate and the audio codec used:
$ ffmpeg -i kitty.flv -target ntsc-dvd -b 2000k -acodec mp2 -ar 22050 -ab 64k -aspect 4:3 kitty2.mpg
{snipped}
Seems that stream 1 comes from film source: 1000.00 (1000/1) -> 25.00 (25/1)
Input #0, flv, from 'kitty.flv':
  Duration: 00:01:43.4, start: 0.000000, bitrate: N/A
  Stream #0.0: Audio: mp3, 22050 Hz, mono
  Stream #0.1: Video: flv, yuv420p, 320x240, 25.00 fps(r)
Output #0, dvd, to 'kitty2.mpg':
  Stream #0.0: Video: mpeg2video, yuv420p, 720x480, q=2-31, 2000 kb/s, 29.97 fps(c)
  Stream #0.1: Audio: mp2, 22050 Hz, mono, 64 kb/s
Stream mapping:
  Stream #0.1 -> #0.0
  Stream #0.0 -> #0.1
Press [q] to stop encoding
frame= 3095 q=4.7 Lsize=   27174kB time=103.2 bitrate=2156.3kbits/s
video:21521kB audio:809kB global headers:0kB muxing overhead 21.696595%
This is what we have so far:
27208 -rw-r--r--  1 howard users 27826176 2006-10-12 21:36 kitty2.mpg
 4252 -rw-r--r--  1 howard users  4340341 2006-10-11 13:31 kitty.flv
45184 -rw-r--r--  1 howard users 46213120 2006-10-12 13:25 kitty.mpg
The second MPEG file is much smaller than the first one, but they're both much bigger than the original Flash Video file. That is because MPEG2 is nowhere near as efficient a codec as some others, not to mention the increased image size (720x480 over 320x240). What we can do, though, is to try a different video codec, like MPEG4 for example. Now, for reasons that I don't understand − after all I'm no expert in this area − mplayer is unable to play back an MPEG4 video created directly from a Flash Video, while ffplay (which is part of ffmpeg) can. And yet, mplayer and ffmpeg share the same codebase. Go figure. So, what we're going to work with from here on in is the first MPEG file, kitty.mpg. Let's transcode it to MPEG4, bring the picture size back down to 320x240 and the frame rate down to 10 fps, see if we can drop the video bit rate to 300 kbit/s, and convert the AC3-encoded, 48000 Hz, 448 kbit/s audio to MP3, 22050 Hz, 64 kbit/s:
$ ffmpeg -i kitty.mpg -vcodec mpeg4 -s 320x240 -b 300k -r 10 -acodec mp3 -ar 22050 -ab 64k -f avi kitty.avi
{snipped}
Input #0, mpeg, from 'kitty.mpg':
  Duration: 00:01:42.8, start: 0.500000, bitrate: 3595 kb/s
  Stream #0.0[0x1e0]: Video: mpeg2video, yuv420p, 720x480, 9000 kb/s, 29.97 fps(r)
  Stream #0.1[0x80]: Audio: ac3, 48000 Hz, mono, 448 kb/s
Output #0, avi, to 'kitty.avi':
  Stream #0.0: Video: mpeg4, yuv420p, 320x240, q=2-31, 300 kb/s, 10.00 fps(c)
  Stream #0.1: Audio: mp3, 22050 Hz, mono, 64 kb/s
Stream mapping:
  Stream #0.0 -> #0.0
  Stream #0.1 -> #0.1
Press [q] to stop encoding
frame= 1034 q=4.3 Lsize=    4837kB time=103.4 bitrate= 383.2kbits/s
What this section should have taught you:
- The "-target" option tells ffmpeg to set a whole bunch of parameters automatically in order to comply with standards related to the specified target. The list of predefined automatic targets is available in the man page for ffmpeg.
- The parameters defined automatically with a "-target" option can be overridden manually or can all be set manually if the "-target" option isn't used at all.
- The video codec is selected with the "-vcodec" option, the picture size with the "-s" option, the video bitrate with "-b" and the frame rate with "-r".
- The "-f" option selects the container format. "ffmpeg -formats" lists the available formats.
CROPPING AND PADDING THE IMAGE
Let's take our original kitty.flv movie and turn it into a widescreen MPEG movie that can be used on a DVD-Video. The trouble is, its aspect ratio is 4:3, which is narrower than the 16:9 of widescreen format. Its current size is 320x240. If we want to give it a widescreen aspect ratio, its height should be 320/(16/9)=180 pixels instead of 240. If we simply resize the image in order to squash it vertically, the picture will be deformed. The only thing we can do in order to stop the picture from going anamorphic is to trim off parts of it, or to "crop" it. The picture is 60 pixels too "tall" so let's shave 30 pixels off the top and off the bottom, then convert the result to a 16:9 NTSC DVD:
$ ffmpeg -i kitty.flv -croptop 30 -cropbottom 30 -target ntsc-dvd -aspect 16:9 kitty.169.mpgExplanations:
- The "-croptop" and "-cropbottom" options slice the given number of pixels off the top and the bottom of the image respectively. There are also "-cropleft" and "-cropright" options for narrowing an image with an aspect ratio that's too high. The number of pixels to slice off must be an even number.
- The various "-crop" options act BEFORE any resizing takes place. They crop the specified number of pixels off the ORIGINAL image.
Now let's turn this 16:9 NTSC video into a 480x360 letterboxed AVI at 15 frames per second. "Letterboxed" means that we keep the whole widescreen image and put bars on the top and bottom so that the resulting bar-image-bar sandwich has the required aspect ratio:
$ fmpeg -i kitty.169.mpg -acodec mp3 -ar 44100 -ab 128k -vcodec msmpeg4v2 -b 500k \
-s 480x270 -r 15 -padtop 44 -padbottom 46 -padcolor 000000 -f avi kitty.letterbox.avi
Explanations:
- If we want to maintain the same aspect ratio for the image itself and if we want to make it 480 pixels wide, then the height will have to be 480/(16/9)=270 pixels, hence the "-s 480x270".
- Our image being 270 pixels high while we need it to be 360 pixels high in order to obtain the standard 4:3 aspect ratio, we need to slap an extra 90 pixels on it. However, the number of pixels specified in the "-padtop" and "-padbottom" options has to be an even number, hence 44 for one and 46 for the other rather than 45 each.
- The color of the padding is specified using the "-padcolor" option. The argument given is a color expressed as three hex bytes just like in HTML (but without the leading "#" sign). See here for a conversion tool that can convert a color into hex notation. There are also "-padleft" and "-padright" options for widening an image with an aspect ratio that's too low for the target.
- The various "-pad" options are applied AFTER resizing has taken place. They add the specified number of pixels to the RESIZED image.
PROCESSING PORTIONS OF MOVIES
Sometimes you might want to process only the first few seconds or minutes of a movie, either because you're playing with different conversion parameters and you want to see the results without having to go through with the conversion of the whole DVD or because you're not interested in the rest anyway. The "-t" option of ffmpeg is used to specify how much footage you want to convert. You can either specify the duration as a whole number of seconds (eg: "-t 90" if you want 1½ minutes of video) or you can use hh:mm:ss.sss notation (eg: "-t 00:02:37.200" for 2 minutes and 37.2 seconds of footage).
You don't have to start the conversion at the beginning of the source video either. You can instruct ffmpeg to read a certain time into the movie before it starts converting. This is done with the "-ss" option, and it takes an argument in the same format as "-t" (whole number of seconds or hh:mm:ss.sss). Example: to start converting 3 minutes into the movie and convert 12 minutes of video from then onwards, you'd use "-ss 180" or "-ss 00:03:00", and "-t 720" or "-t 00:12:00".
STRIPPING AUDIO OR VIDEO
It can be desirable to strip the sound track from a movie in order to dub another onto the video, or you might want to do the opposite and extract the audio from a movie (and discard the video) so that you can listen to it on your MP3 player.
Given that you don't actually need to extract the video stream from your movie file in order to dub different audio onto it (we'll see how to do it in the section entitled Multiple Sources), we'll only bother with the second case mentioned. Suffice it to say that the "-an" option tells ffmpeg not to include any audio in the output file, leaving you with a container that includes only video data. Since you'd deal with it technically in exactly the same way as the original movie, the operation of stripping the audio was pretty much a waste of time and disk space.
In order to strip the video stream from the movie file and retain only the audio, you use the "-vn" option. ffmpeg will then output nothing but audio data encoded according to the "-acodec", "-ar", "-ab" and "-ac" options given. As an example of this, let's assume I'm a Jonathan Coulton fan (I do quite like some of his stuff) and I want to grab the audio track off one of the "Mandelbrot Set" movie clips that are up on youtube.com. Fetch the movie in the same way as you did for the kitty composer, only the URL for this one is:
http://www.youtube.com/watch?v=gEw8xpb1aRASave the file as "mandelbrot.flv".
The audio quality leaves a bit to be desired since it was compressed rather ruthlessly in order not to bloat the movie file too much, but let's assume I want to burn this song to a CD. This means that I'm going to have to make sure that the audio comes out uncompressed at a sample rate of 44100 Hz in 16-bit samples and 2 channels (stereo). The easiest by far is to conform to the WAV specification since cdrecord can handle these files directly:
$ ffmpeg -i mandelbrot.flv -vn -acodec pcm_s16le -ar 44100 -ac 2 mandelbrot.wavThere, that was painless. "-vn" told ffmpeg not to bother with any video, and the "-acodec", "-ar" and "-ac" options ensured the data was compatible with a CDDA.
If we look more closely at the output of ffmpeg, we see that the audio is MP3-encoded in the movie file:
Input #0, flv, from 'mandelbrot.flv':
  Duration: 00:04:25.7, start: 0.000000, bitrate: N/A
  Stream #0.0: Audio: mp3, 22050 Hz, mono
  Stream #0.1: Video: flv, yuv420p, 320x240, 29.97 fps(r)
Surely it must be possible to simply extract this audio data without processing it in any way so that I can upload it to my MP3-player and listen to it on that, right?
$ ffmpeg -i mandelbrot.flv -vn -acodec copy mandelbrot.mp3The audio codec "copy" tells ffmpeg to use the same codec for encoding as was used for decoding. Also, since we're not overriding any of the other audio parameters such as sample rate or bit rate, we should be retrieving the sound track exactly as it was multiplexed into the movie file.
There is a similar "-vcodec copy" option that applies to the video stream.
It is also possible to extract the sound track from a DVD-Video. If you want to go directly from the DVD to audio data you can use MPlayer and its "-ao pcm:file=output.wav" option to get a WAV file with a sampling rate of 48000 Hz and 16-bit, stereo samples that you can process as you wish. However, if you've used a tool such as tccat to obtain a .vob file of a DVD title, you can feed the .vob file to ffmpeg and extract the audio that way. This has the advantage that you can manipulate the audio (resample, compress, downmix etc.) on-the-fly using the appropriate -acodec.
MAPPING CHANNELS
Coming back to the .vob file ripped from a DVD with tccat, it's commonplace for such multimedia files to have multiple audio streams embedded in them. Indeed, the DVD standard provides for up to 8 audio streams. Unless instructed otherwise, ffmpeg will operate on the first available sound track. It so happens that I have such a .vob file on-disk, so let's see what ffmpeg thinks of it:
$ ffmpeg -i mr.vob
FFmpeg version SVN-r9607, Copyright (c) 2000-2007 Fabrice Bellard, et al.
{snipped}
Seems that stream 0 comes from film source: 25.00 (25025/1001) -> 25.00 (25/1)
Input #0, mpeg, from 'mr.vob':
  Duration: 00:03:16.2, start: 620.890956, bitrate: 7704 kb/s
  Stream #0.0[0x1e0]: Video: mpeg2video, yuv420p, 720x576, 6799 kb/s, 25.00 fps(r)
  Stream #0.1[0x89]: Audio: dts, 48000 Hz, stereo, 768 kb/s
  Stream #0.2[0x80]: Audio: ac3, 48000 Hz, 5:1, 384 kb/s
  Stream #0.3[0x83]: Audio: ac3, 48000 Hz, stereo, 96 kb/s
  Stream #0.4[0x82]: Audio: ac3, 48000 Hz, stereo, 96 kb/s
  Stream #0.5[0x84]: Audio: ac3, 48000 Hz, stereo, 192 kb/s
  Stream #0.6[0x2d]: Subtitle: dvdsub
  Stream #0.7[0x2c]: Subtitle: dvdsub
  Stream #0.8[0x2b]: Subtitle: dvdsub
  Stream #0.9[0x2a]: Subtitle: dvdsub
  Stream #0.10[0x29]: Subtitle: dvdsub
  Stream #0.11[0x28]: Subtitle: dvdsub
  Stream #0.12[0x27]: Subtitle: dvdsub
  Stream #0.13[0x26]: Subtitle: dvdsub
  Stream #0.14[0x25]: Subtitle: dvdsub
  Stream #0.15[0x24]: Subtitle: dvdsub
  Stream #0.16[0x23]: Subtitle: dvdsub
  Stream #0.17[0x22]: Subtitle: dvdsub
  Stream #0.18[0x21]: Subtitle: dvdsub
  Stream #0.19[0x20]: Subtitle: dvdsub
The first stream, #0.0, is the video stream. Stream #0.1 is the DTS-encoded sound track and #0.2 is its AC3-encoded Dolby 5:1 equivalent. Stereo audio streams #0.3 through #0.5 are soundtracks with commentaries. Say I want to create a mono MP3 from this with the commentary from the third audio stream, #0.3. If I don't tell ffmpeg which one to use, it'll go ahead and transcode the first one it finds, the DTS stream in this case. I don't want that. This is where the "-map" option comes in handy:
$ ffmpeg -i mr.vob -map 0:3 -vn -acodec mp3 -ar 22050 -ab 96k -ac 1 mr.mp3"-map input:stream" tells ffmpeg to process the given stream. As we'll see later on, ffmpeg can process input from several files. "input" is the zero-based index of the input file we want to use − 0 for the first, 1 for the second etc. "stream" is the number of the stream within this file that we want to use, also zero-based. "-map 0:3" therefore means that we want to use the fourth stream in the first (and only, in this case) input file.
"-map" can also be used to create a new movie from this .vob file using, for example stream #0.0 for the video and #0.5 for the audio. If any streams in a video file are mapped with "-map" then they must all be specified explicitly. In this case the first "-map" option specifies the stream to use for the video and the second one specifies which stream to use for the audio:
$ ffmpeg -i mr.vob -map 0:0 -map 0:5 -vcodec mpeg4 -b 1000k \
-s 640x360 -acodec mp3 -ar 22050 -ab 64k -ac 1 -f avi mr.avi
MULTIPLE SOURCES
One of the pieces of equipment adorning my video rig here at home is a DVD recorder. Almost invariably, I record direct onto a DVD+RW so that I can take the program I'm recording apart, rework the audio track (boost the volume level among other things), put it back together again, archive the modified program onto a DVD±R and put the DVD+RW back into circulation for the next recording.
Once the audio track has been extracted and reworked, I can reassemble the movie in either of two manners:
- Also extract the mpeg2video data from the .vob file and then multiplex it and the reworked audio (duly converted to MP2 or AC3) with mplex, or
- Ask ffmpeg to pull the video in from the original .vob file and the audio from the reworked .wav audio file and transcode it on-the-fly.
Solution 1 is already the object of another howto page (which needs finishing now that I think of it). This is how we use solution 2:
$ ffmpeg -i oldmovie.vob -i altered_audio.wav -map 0:0 -map 1:0 -target ntsc-dvd \
-b required_video_bit_rate -aspect 16:9 newmovie.mpg
Or, if you'd rather use MP2 audio and a lower audio bit rate:
$ ffmpeg -i oldmovie.vob -i altered_audio.wav -map 0:0 -map 1:0 -target ntsc-dvd \
-b required_video_bit_rate -acodec mp2 -ab audio_bit_rate -aspect 16:9 newmovie.mpg
Obviously replace "16:9" with "4:3" if you're reworking a 4:3 aspect ratio movie. Also, this assumes that the first stream in the .vob file is the video stream, so you'll need to adjust the "-map 0:0" accordingly if, for example the video stream is the second stream as is the case with my DVD recorder, in which case you'll need "-map 0:1" instead. Either way round, this is the stream that'll be used for the video in the output file. The audio stream is mapped to "-map 1:0". The "1" means "second file" (remember, the list is zero-based) and the ":0" means "first stream".
DELAYING THE AUDIO OR THE VIDEO
Depending on how your original files were generated, it could happen that the sound and the picture become out of sync when you start processing them with ffmpeg. Thankfully, there's a mechanism that will allow you to stagger the audio and video with respect to each other in the output, thus bringing them back into alignment − the "-itsoffset" option, which is used this way:
$ ffmpeg -i input_1 -itsoffset 00:00:03.5 -i input_2 ...........In this example, input_2 will be delayed by 3.5 seconds. In other words, The content of input_1 will start at the beginning of the movie generated by ffmpeg, and the content in input_2 will start 3.5 seconds into the movie.
In real life you're unlikely to come across such an extreme case of A/V skew. I do, however, come across cases regularly that need correcting by a fraction of a second. Using MPlayer to fast-forward into the movie you're generating and then the + and - keys to add more or less delay in 100ms increments gives you a good idea of how much delay to use and whether it's the sound or the picture that needs delaying.
Remember to put the source that needs delaying after the "-itsoffset" option. Thus, if the audio comes in too soon and needs delaying:
$ ffmpeg -i video_source -itsoffset delay -i audio_source -map 0:x -map 1:y ......Conversely, if the audio comes in too late and the video therefore needs delaying:
$ ffmpeg -i audio_source -itsoffset delay -i video_source -map 1:x -map 0:y ......Note how the "-map" options specify video from the second source and audio from the first in this second example.
Note also that video_source and audio_source can be the same file. Nothing's to stop you from fixing (or breaking) the A/V sync within the same original movie.
WORKING WITH ANAMORPHIC VIDEO
This is where things start getting moderately scary. Up until now we've been playing with videos that weren't anamorphic to start with, meaning that the physical image displayed on-screen had the same aspect ratio as the number of pixels making up the width and height of the image. For example, we've converted a Flash Video file that was 320x240 pixels in size and had a physical aspect ratio of 4:3. 320/240 = 4/3, therefore there is no anamorphism. This time we're going to crop the sides off a 16:9 video from a DVD-Video in order to bring it back to 4:3.
First, we're going to have to come to grips with a concept that I call the "Anamorphic Factor", which describes how an image has to be stretched or compressed to go from its pixel aspect ratio to its physical aspect ratio.
It was pointed out earlier that all movies on an NTSC DVD-Video have a resolution of 720x480 pixels. The pixel aspect ratio is therefore 720/480. The physical aspect ratio of the 16:9 image on-screen is 16/9. If we divide the physical aspect ratio by the pixel aspect ratio we get the Anamorphic Factor, that I call delta δ, and which basically represents the aspect ratio of the pixels (the pixels themselves are not square in an anamorphic image).
There are three possible cases:
- δ > 1 − The image is stretched horizontally from its pixel aspect ratio in order to attain the desired physical aspect ratio.
- δ = 1 − The pixel aspect ratio and the physical aspect ratio are the same. There is no anamorphism.
- δ < 1 − The image is squeezed horizontally from its pixel aspect ratio in order to attain its physical aspect ratio.
In the present case: δ = 16/9 / (720/480)
δ = 16/9 x 480/720 = (16x480)/(9x720) = 7680/6480 = ( 2^9 x 3 x 5 ) / ( 2^4 x 3^4 x 5 ) = 2^5 / 3^3
δ = 32/27Remember, we're about to cut the sides off our image rather than squeeze it, meaning that we need to maintain its anamorphic factor. So, how many pixels should we shave off the sides? Or, put another way, how many pixels wide would an image have to be so that, once the anamorphic factor δ is applied to it, it has a physical aspect ratio of 4:3?
Written mathematically, we're looking for "W" in this equation:
W/H x δ = 4/3, or
W = 4/3 x H/δWe happen to know H, it's 480 pixels. Substituting the known values in the equation above, we get W=540 pixels
So, if we shave 180 pixels off our anamorphic image, reducing its width from its original 720 pixels to 540, we should end up with a new image that, when the same anamorphic factor, δ, is applied to it, should have an aspect ratio of 4:3. Let's check:
540/480 x δ = 540/480 x 32/27 = ( 540 x 32 ) / ( 480 x 27 ) = 17280 / 12960 = 2^7x3^3x5 / ( 2^5x3^4x5 ) = 4/3
QED.This means that, in order to crop a 16:9 NTSC video and turn it into a 4:3 video, we'd have to do something like this:
$ ffmpeg -i original_video -cropleft 90 -cropright 90 \
-target ntsc-dvd ........ -aspect 4:3 output_video
This time, instead of cropping the sides of the image, let's add black bars at the bottom and the top (letterbox) in order to obtain the 4/3 aspect ratio that way. For this we're going to need to know the anamorphic factor of a 4:3 image on a DVD-Video, and we'll call it δ'.
δ' = 4/3 / (720/480) = ( 480 x 4 ) / ( 720 x 3 ) = 160 / 180 = 8/9
Yes, a 4:3 video on an NTSC DVD has an anamorphic factor less than 1, meaning that the picture is squeezed horizontally before being displayed.
If we divide the height of our anamorphic 16:9 image by δ we'll know how many pixels high it would have to be in order to no longer be anamorphic. If we then multiply that height by δ' we'll know how high it'll be in our new 4:3 image (also anamorphic). From that we'll be able to deduce how many pixels thick the "black bar sandwich" will have to be. So, the new height, H', will be:
H' = ( H / δ ) x δ' = ( 480 / (32/27) ) x 8/9 = 15 x 27 x 8/9 = 3240/9 = 360
Let's check this. If the answer is correct, then an image of 720x360 should be 16:9 once adjusted by an anamorphic factor of δ', 8/9:
720/360 x 8/9 = 5760/3240 = (2^7 x 3^2 x 5) / (2^3 x 3^4 x 5) = 2^4 / 3^2 = 16/9
QED.If our letterboxed image is 360 pixels high we're going to have to add another 120 pixels to make up the whole 720x480 image, so this is what the command line would look like:
$ ffmpeg -i input_video -target ntsc-dvd ............. \
-s 720x360 -padtop 60 -padbottom 60 -padcolor 000000 -aspect 4:3 output_video
Let's do the same thing but for a .3gp movie file to be played back on a 3G cellphone. The video codec we'll be using is the H263 codec, which only allows a few predefined picture sizes. We'll be using 176x144. However, .3gp movies are reproduced at an aspect ratio of 4:3, meaning that they, too, are anamorphic. The audio codec we'll be using is the AMR narrowband codec, which requires a sampling rate of 8000 Hz, mono audio and a bit rate no higher than 12 kbit/s. We're also going to reduce the frame rate to 10 frames per second.
We're dealing with a different output technology and therefore a different δ'. For this technology:
δ' = 4/3 / (176/144) = ( 4 x 144 ) / ( 3 x 176 ) = 576/528 = ( 2^6 x 3^2 ) / ( 2^4 x 3 x 11 ) = ( 2^2 x 3 ) / 11 = 12/11
If our image is to be squeezed into something that's only 176x144 pixels in size, we know its new width but we need to calculate its new height. If the image wasn't anamorphic, that new height would be 176 / (16/9), or (176x9)/16 = 99 pixels. But it is anamorphic, so we need to multiply 99 pixels by the δ' for this device:
H = 99 x 12/11 = 9x12 = 108 pixels
In order to make up the 144 pixels of height we'll need to add 36 pixels of black, that's 18 either side. So, the command line is going to look like this:
$ ffmpeg -i input_video -vcodec h263 -s 176x108 -b 300k -r 10 \
-padtop 18 -padbottom 18 -padcolor 000000 \
-acodec libamr_nb -ar 8000 -ab 12.2k -ac 1 \
-f 3gp -aspect 4:3 output.3gp
TIPS & TRICKS
Most standard image resolutions in videos are multiples of 4. Now, when calculating new widths and heights, you're not always going to be lucky like we were in the examples of this howto, and you could quite conceivably find yourself in a situation where you have to shrink something to 462.625 pixels in height, for example. Obviously, you can't leave or crop fractions of a pixel, so you have to compromise. If you're just resizing something and not cropping or padding then round the results you get to the nearest multiple of 2. If, on the other hand, you're planning on cropping or padding, I suggest you round the values you find to the nearest multiple of 4. The inaccuracy in the final aspect ratio of your movie file will be imperceptible, but you'll have engineered things so that you can crop or pad an even number of pixels either side, thus keeping everything nice and centered. This said, most modern video codecs work in a way that that is far more efficient and less wasteful if both the horizontal and vertical pixel sizes are multiples of 16.
Calculating the video bitrate you should use when transcoding a movie can be tricky at times, but only when you go about it the wrong way. Start by deciding how big you want (or can allow) the files to be and divide that space by the duration of your movie. This will provide you directly with the combined audio and video bit rate that you can use. For example, what bitrates should be used when recording 120 minutes of video onto a DVD? Allowing for multiplexing and filesystem overhead and for a small safety margin, we can say that we have 4.5 billion (4,500,000,000, that's 45 followed by 8 zeros − got that, Scott?) bytes to play with. Divide that by 120 and we get 37,500,000 bytes per minute. Divide that by 60 and we get 625,000 bytes per second, or 5,000,000 bits (5,000 kbits) per second. Subtract from that the audio bit rate and you have the video bit rate you can use. Lower the resulting value by 5% to allow ffmpeg room to breathe because the effective bit rate achieved is variable and will never be precisely what you ask for.
You can also use ffmpeg to concatenate multiple videos into one long video. Start by transcoding all the individual videos into MPEG format, all with exactly the same bit rates, codecs, image resolutions, frame rates etc. Mistakes can be avoided by using one of ffmpeg's predefined targets such as ntsc-dvd or pal-dvd. Once that's done, simply string the resulting .mpg files together using "cat" and redirect the output to another .mpg file. Now, the timestamps inside the resulting, big .mpg file are all going to be messed up, so you'll have to process the big .mpg file with ffmpeg again. This will have the effect of putting the timestamps right.
Last update: 01-FEB-2012
This page has been served 1331062
times since 10-OCT-2006